先週のエントリー「この機会にマスターしようぜ、正規表現、構文図、オートマトン」において、正規表現とオートマトンの理屈は説明しました。んじゃ、適当な正規表現に対応するオートマトンを作ってみましょう。
非決定性オートマトンはめんどくさいので決定性オートマトンにします。正規表現から作ったオートマトンが非決定性になってしまったときは、がんばって決定性オートマトンに変形するかあきらめるかしてください。
例題となる正規表現とオートマトンは、「Erlang実験室:状態遷移を書くのはこんなに簡単」で使ったものをそのまま流用します。
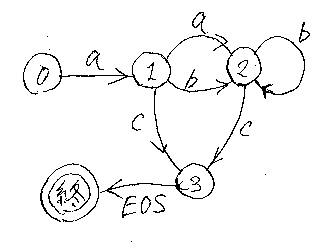
- 正規表現: (a, a?, b*, c)
図と表のなかで、EOSは End Of String のマーカー、◎は終状態です

遷移表: 0から3までの各状態について、入力ごとの遷移先は次の通り。×はエラーです。
| 状態 | 文字a | 文字b | 文字c | EOS | その他 |
|---|---|---|---|---|---|
| 0 | 1 | × | × | × | × |
| 1 | 2 | 2 | 3 | × | × |
| 2 | × | 2 | 3 | × | × |
| 3 | × | × | × | ◎ | × |
今回はJavaScriptで実装します。EOSにはドル記号'$'を使い、終状態は状態番号を-1として識別します。状態遷移表を、switch文のようなプログラムの制御構造として表現するのではなくて、データとして与えます。状態遷移表のデータを入れ替えれば、色々なオートマトンを実現できます。
上の表に対応する状態遷移を表すデータは次のとおり。
var transition = [

 /* 0 */ {"a" : 1},

 /* 1 */ {"a" : 2, "b" : 2, "c" : 3},

 /* 2 */ {"b" : 2, "c" : 3},

 /* 3 */ {"$" : -1}

];
オブジェクトを項目とする配列データですね。配列の位置が現状態、オブジェクトのプロパティ名が入力、オブジェクトのプロパティ値が次の状態を表しています。
オートマトンはAutomatonというクラスにしているので、コンストラクタに状態遷移表データを渡してオートマトン・インスタンスを生成します。オートマトンの実行は run というメソッドを使うことにします。次はFirebugでの実行例。ソースはその後に貼りつけてあります。さらにその後に注意事項が書いてあります。
>>> var autom = new Automaton(transition);

>>> autom.run("abc");

[Result] abc is accepted.

>>> autom.debug = true;

true

>>> autom.run("abc");

[Trace] state:0 input:a next:1

[Trace] state:1 input:b next:2

[Trace] state:2 input:c next:3

[Trace] state:3 input:$ next:-1

[Result] abc is accepted.

>>> autom.run("aabc");

[Trace] state:0 input:a next:1

[Trace] state:1 input:a next:2

[Trace] state:2 input:b next:2

[Trace] state:2 input:c next:3

[Trace] state:3 input:$ next:-1

[Result] aabc is accepted.

>>> autom.run("aaabc");

[Trace] state:0 input:a next:1

[Trace] state:1 input:a next:2

[Trace] state:2 input:a next:undefined

[Result] aaabc is refuted.

>>> autom.run("axbc");

[Trace] state:0 input:a next:1

[Trace] state:1 input:x next:undefined

[Result] axbc is refuted.

>>> autom.run("abbc");

[Trace] state:0 input:a next:1

[Trace] state:1 input:b next:2

[Trace] state:2 input:b next:2

[Trace] state:2 input:c next:3

[Trace] state:3 input:$ next:-1

[Result] abbc is accepted.
Automaton.js :
/* Automaton.js */

function Automaton(transition) {
    this.transition = transition;
    this.state = 0; // 0 は始状態
    this.debug = false;
    this._display = (console && console.firebug && console.log)? console.log : alert;
}

Automaton.ACCEPT = 1;
Automaton.REFUTE = 0;
Automaton.MORE =  2;

Automaton.prototype.accept = function(input) {
    var next = this.transition[this.state][input];
    this.trace(input, next);
    if (next === -1) {
        return Automaton.ACCEPT; // 受理
    }
    if (next === undefined) {
        return Automaton.REFUTE; // 拒否
    }
    this.state = next;
    return Automaton.MORE; // 状態遷移して継続
};

Automaton.prototype.trace = function(input, next) {
    if (this.debug) {
        this._display("[Trace] state:" + this.state + " input:" + input + " next:" + next);
    }
};

Automaton.prototype.reset = function() {
    this.state = 0;
};

Automaton.prototype.run = function(inputString) {
    var s = inputString;
    if (s.charAt(s.length - 1) != "$") {
        s = s + "$";
    }
    this.reset();
    for (var i = 0; i < s.length; i++) {
        var result = this.accept(s.charAt(i));
        switch (result) {
        case Automaton.ACCEPT :
            this.sayResult(inputString + " is accepted.");
            return;
        case Automaton.REFUTE :
            this.sayResult(inputString + " is refuted.");
            return;
        case Automaton.MORE :
            ; // continue loop
        }
    }
    this.sayResult("Something wrong.");
};

Automaton.prototype.sayResult = function(str) {
    this._display("[Result] " + str);
};
autom.html :
<html><!-- autom.html -->
  <head>
    <title>Automaton Test</title>
    <script src="Automaton.js"></script>
    <script>
      var transition = [
       /* 0 */ {"a" : 1},
       /* 1 */ {"a" : 2, "b" : 2, "c" : 3},
       /* 2 */ {"b" : 2, "c" : 3},
       /* 3 */ {"$" : -1}
      ];
    </script>
  </head>
  <body>
    <h1>Automaton Test</h1>
  </body>
</html>
注意事項
入力の終りはドル記号で識別しますが、文字列の最後にドル記号がなくてもメソッドrunの内部で付け足します。よって、runに渡す文字列にドル記号がなくても大丈夫です。文字列の中間にドル記号を入れると、そこで入力が終ります。
>>> autom.run("abc$aa");

[Trace] state:0 input:a next:1

[Trace] state:1 input:b next:2

[Trace] state:2 input:c next:3

[Trace] state:3 input:$ next:-1

[Result] abc$aa is accepted.
「この機会にマスターしようぜ、正規表現、構文図、オートマトン」では、「終状態にいるときにエンドマーカー記号(この場合はドル記号)を入力すると受理が成功」でしたが、今回の実装では、「エンドマーカー記号を入力しての遷移先が終状態なら受理が成功」です。これは、「Erlang実験室:状態遷移を書くのはこんなに簡単」の例をそのまま使ったため*1です。
微妙な違いはありますが、本質的な差ではありません。自分の好みや実装上の都合で適当に決めてもかまいません。次のコードは、「状態番号が最大の状態が終状態」という約束のもとで、「終状態にいるときにエンドマーカー記号(この場合はドル記号)を入力すると受理が成功」*2という判断を書き下したものです。これを使うなら、状態遷移データの側にはエンドマーカー記号に対する遷移を書きません。
Automaton.EndOfInput = '$';
Automaton.finalState = function (trans) {
    return trans.length - 1;
};

Automaton.prototype.accept = function(input) {
    var next = this.transition[this.state][input];
    this.trace(input, next);
    if (input == Automaton.EndOfInput) {
        if (this.state === Automaton.finalState(this.transition)) {
            return Automaton.ACCEPT; // 受理
        } else {
            return Automaton.REFUTE; // 拒否
        }
    }
    if (next === undefined) {
        return Automaton.REFUTE; // 拒否
    }
    this.state = next;
    return Automaton.MORE; // 状態遷移して継続
};